D-DAY & NORMANDY
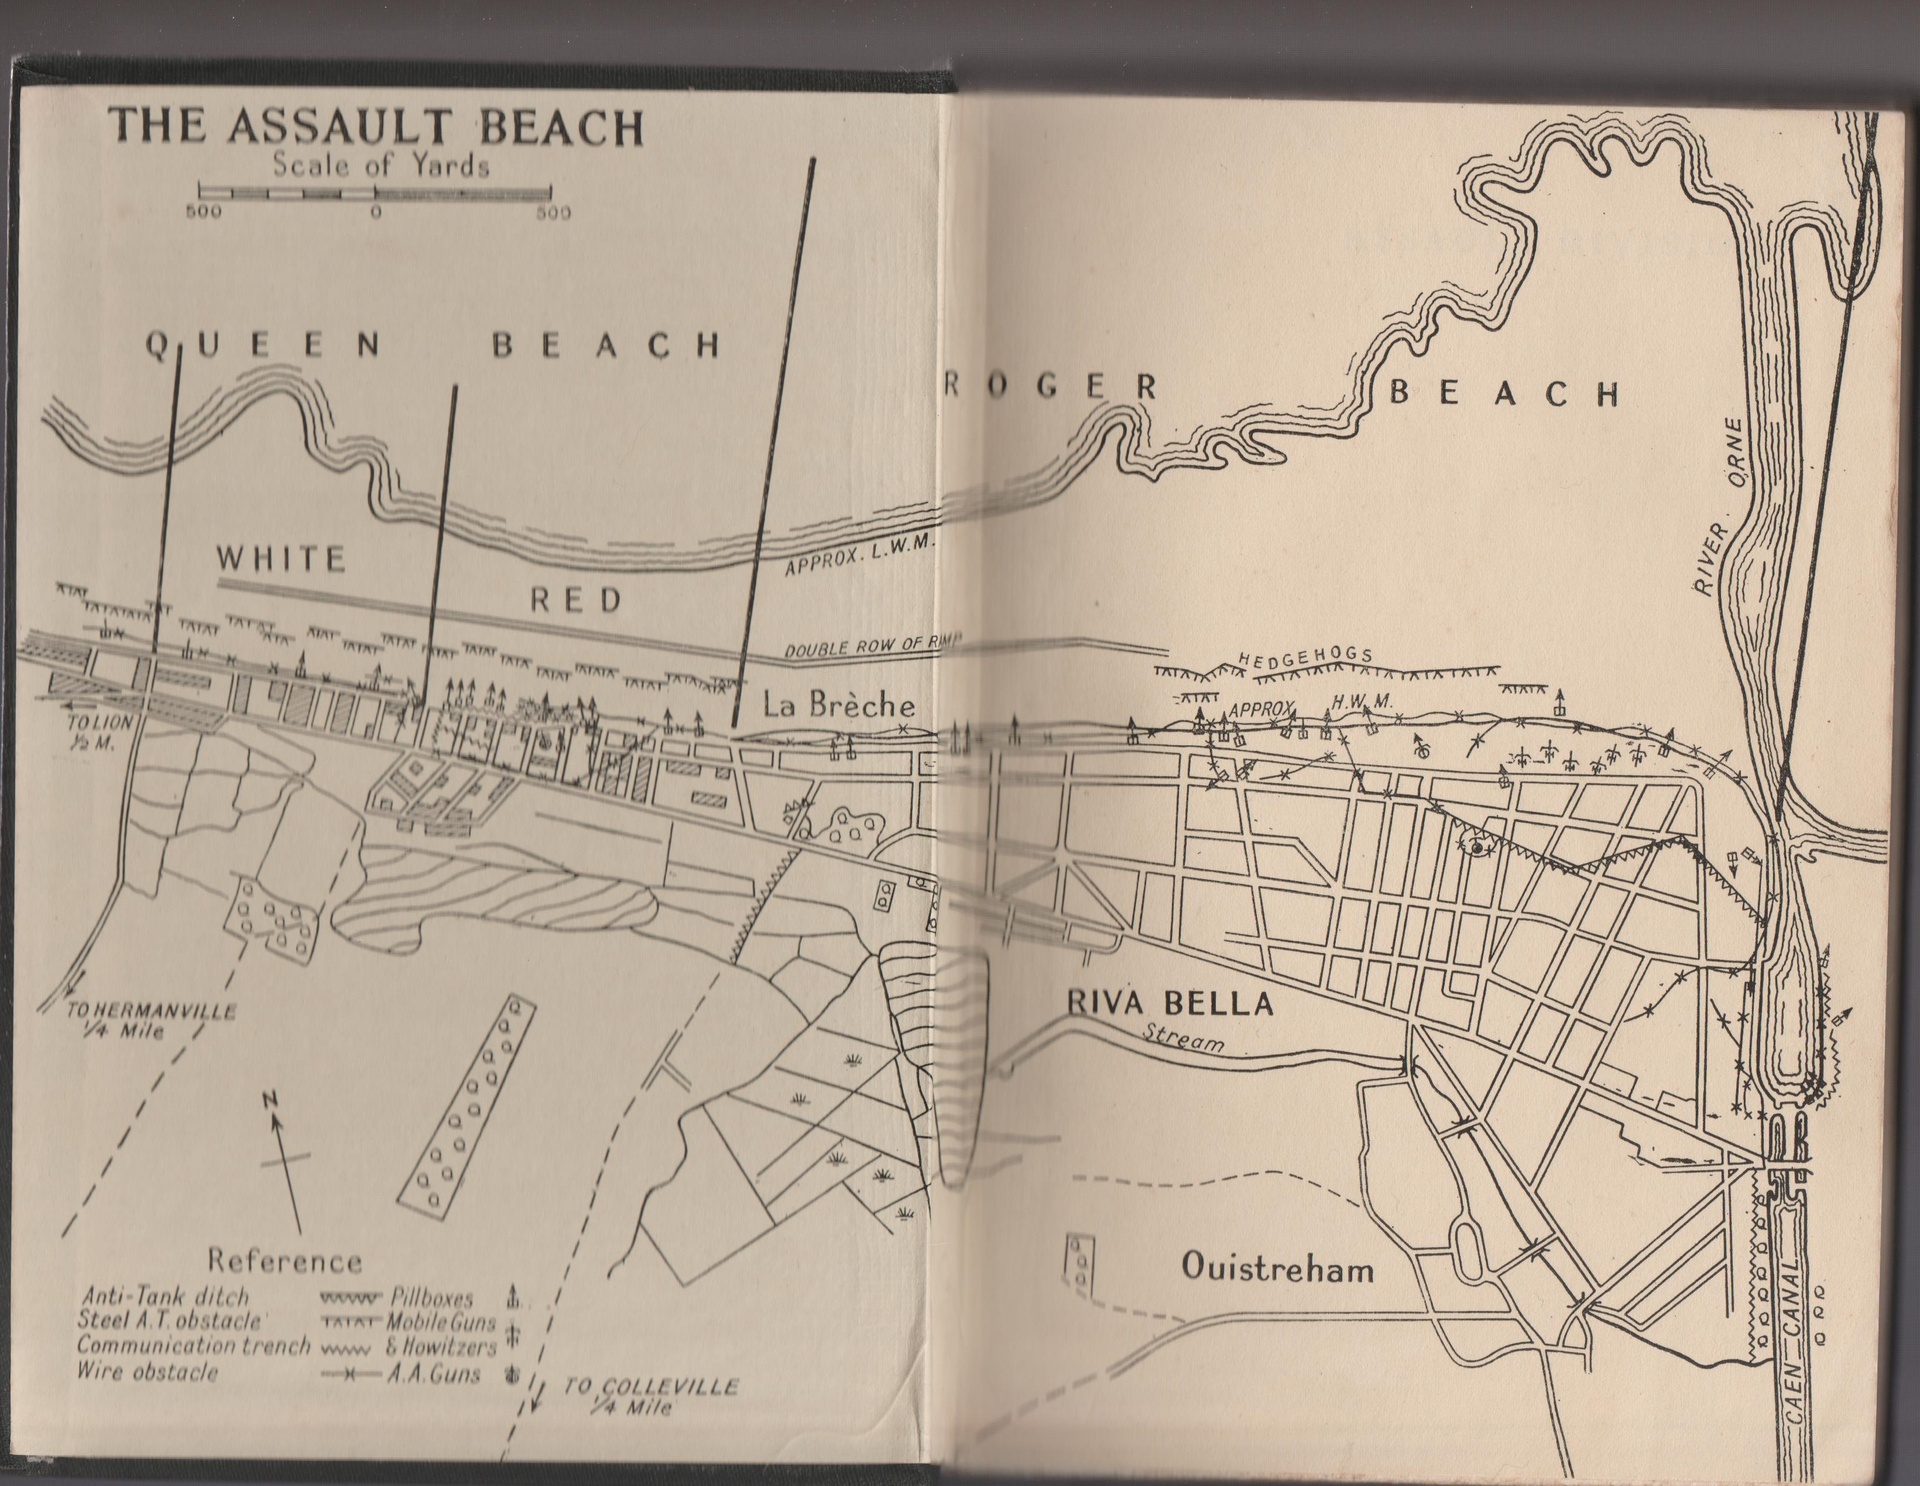
The 6th June, 1944 (D-Day) saw the 2nd
Battalion, Royal Warwicks, come ashore on the
Normandy beaches as part of 185 Brigade, 3rd
Infantry Division. The Division had been
assigned the landing beach codenamed
'Sword'. The landing sector was roughly 8
kilometres in length, with 3rd Division
assigned a 3 kilometre stretch, code named
'Queen'. The Warwicks were assigned a
sub-sector of Queen, 'Queen-White'
At 'H' Hour, 7.25 am, the assault troops started to come ashore, with the 8th Brigade (also part of 3rd Division) fighting to secure a foot hold on the French coast which could then be cleared of mines and obstacles by Engineers ready for 185 Brigade to land and advance past them towards Caen, one of the Divisions key objectives for D-Day. By the time 185 Brigade approached the beach and despite the considerable difficulties presented by high tides obscuring obstacles and stubborn enemy resistance, 8th Brigade had secured a number of exits from the beach but only at the loss of many men and much equipment.
The Warwicks, along with the rest of 185, approached their appointed sector at 9.55. The Battalion of four infantry Companies (A to D referred to in shorthand as 'Coy'), with the Regimental HQ headed towards the beach in three LCI's (Landing Craft Infantry). Each LCI guided to its landing point by a navigational aid on land, which in this case, was described in pre landing briefings as the 'Gable-Ended House'.
As the men of the Regiment, most suffering from lack of sleep and seasickness from the heavy swell, put on their equipment and checked their weapons, they came under fire for the first time since their retreat at Dunkirk 4 years previously. At first the occasional shell would wail over head, but the closer the vessels came to the beach, the more enemy fire was directed at them. As the LCIs came in to land, the one containing B Coy, part of D Coy and the Regimental Commanding Officer (Lieutenant-Colonel H.O.S. Herdon) was struck 3 times by enemy shells and the front disembarkation ramps (two thin rails which were lowered when the craft had landed to allow troops to move down onto the beach below) were destroyed by enemy mortar rounds. The LCI crew was able to manoeuvre their stricken vessel alongside a craft already beached during 8th Brigades preliminary landings and the men on-board were, at great risk, able to transfer to, and subsequently disembark from, this vessel. Although casualties were incurred, the quick thinking and bravery of the naval vessel's crew undoubtedly saved many men of the Regiment that day.
Thankfully for the Battalion this was the only such incident which affected their landing. A Coys LCI landed without incident, and, although striking a mine as it grounded, C Coys LCI made it to shore allowing it's men to disembark.
Once ashore the troops were confronted with the sound of gunfire seeming to come from every direction, acrid smoke from burning vehicles and houses, and discarded or knocked out equipment laying everywhere. By the time they had landed the fighting had moved inland with 8th Brigade, so very little enemy fire was intentionally aimed at 185 Brigade. This allowed the men to move towards their Battalion rally point roughly half a mile inland from Lion sur Mer.

.jpg)
At this stage, 3rd Division's plan had been to strike for Caen with the Sherman tanks of the Staffordshire Yeomanry (27th Independent Armoured Brigade) pushing south, with the men of King Shropshire Light Infantry (K.S.L.I) mounted aboard to allow a swift advance which would be then supported by the 1st Battalion Royal Norfolks and 2nd Battalion Royal Warwicks who would advance on foot. However, even as 185 were moving into their initial rally points, the plan was beginning to become untenable. The majority Staffs Yeomanry were still on the beach by 11.30, when the Warwicks' 4 Infantry Companies had assembled at their rally point, due to the wreckage and confusion of the landing beach. On top of this, the 1st Battalion Norfolks were held up on the eastern flank by two heavily defended strong points just south of Coleville that 8th Brigade were still battling to subdue.
To compound the problem,2nd Battalion's assembly area, in and around a walled cemetery on the southern outskirts of Lion Sur Mer, began to receive increasing amounts of sniper and machine gun fire from the direction of Cressons (the Battalions right flank), making movement from position to position almost impossible and casualties began to be taken. Warwickshire snipers were sent out into the cornfields to try and dispatch their German counterparts and silence the enemy machine guns. They encountered some initial success, killing or wounding at least 2 German snipers in hidden positions before they themselves took enemy fire, with one man shot in the knee.
As the men of the regiment kept their heads down, attempted to dig in and returned fire where they could, fresh orders came down from Brigadier K. P Smith. They were to break contact with the enemy with the intention of moving south east, towards the Norfolk positions near Coleville. Following orders, the Warwicks were able to put in an effective fighting withdrawal, breaking contact with the enemy by laying smoke, staying low and putting in suppressing fire on suspected enemy positions before rallying at the East side of the walled cemetery. However this was not achieved without cost, with a dozen men killed or wounded including the Battalion's first officer casualty in Normandy, Lieutenant R Pratt of C Coy.
It was shortly after midday on the 6th that the Warwicks, having broken contact with the enemy, moved South East to Hermanville sur Mer in a fast march. It was here that all the companies came together as an entire unit since their landing many hours before. This included the Battalions 'S' Coy (Support company) which had landed later than the infantry due to the need for its vehicles to be carried in an LCT (Landing Craft Tank).
From Hermanville the Warwicks then followed the roads to take them through St Aubin d'Arequenay in a South-Easterly direction passing through already captured areas. It was at this point that the vital necessity of advance became apparent as every road was choked with men and vehicles all the way back to the landing beaches where yet more troops were coming ashore. If the invasion was to succeed then breakouts must be made to widen and exploit the foothold.
.jpg)
.jpg)
From the South East corner of St Aubin, orders came through for the Warwicks to attack the town of Benouville and link up with elements of the 6th British Airborne Division holding the canal and river bridges on the D-Day landings Eastern flank.
As the Warwicks began to move into position
for the attack, waves of planes, towing glider reinforcements
for the British Airborne troops, overflew their position and began
landing around them, causing the Germans in
the town to open fire upon the landing troops
and disclose their positions to the attacking
infantry. Most gliders landed successfully,
despite the enemy flak and this distraction
allowed the Warwicks to move forward quickly
from position to position, with B Coy in
the lead. The fighting was fast, brutal and at
close quarters and, even after the engagement
enemy snipers continued to harass and kill,
each having to be hunted and killed.
Sadly, during the landing, one of the
landing gliders crushed and killed 2 Warwick
radiomen of B Coy who were using their radios
and could not hear the shouted warnings of their
fellow soldiers.
As per the plan, once Benouville had been secured, D Coy was detached from the Battalion and moved to the river and canal bridges over the Orne to relieve the entrenched 6th Airborne elements; that had secured them much earlier that day. This then reinforced both 3rd Divisions, and the Allied landings, Eastern flank. The remaining 3 infantry companies and S coy, with limited tank support from the Shermans of the 13th/18th Royal Hussars (Queen Mary's Own), began moving South on the river road towards Blainville.
Contact with the enemy was made almost immediately, with sporadic heavy machine gun and anti tank fire (believed to be from either anti tank guns or German assault guns). 2 Sherman tanks were hit almost immediately after leaving the outskirts of Benouville , including that manned by the an artillery observer for a nearby Royal Artillery Field Battery. It is believed that 2nd Battalions Regimental Sergeant Major was stood on the rear of the artillery observers tank, directing fire, when the tank was hit with such force that the ammunition ignited, blowing the turret (weighing over 3 tonnes), and the RSM, off the tank.
Against this sporadic but aggressive resistance, most likely mounted by mobile defensive units of the German 21st Panzer Division, the Battalion moved forwards in the growing gloom. Blainville was directly south of the Battalions advance with the northern most suburbs being cleared before the halt was called and the men ordered to dig in. Sporadic contact was made with enemy patrol and counter patrol actions, leading to more killed and captured Germans but with no loss to the Warwicks.
Thus D-Day saw the Warwicks firmly upon French soil, suffering 4 killed and 35 wounded. A comparatively small cost when put against the 683 total killed by the British forces on and around Sword beach.
-1.jpg)